728x90
반응형
✔ 기본예제 1
<!DOCTYPE html>
<html lang="en">
<head>
<meta charset="UTF-8" />
<meta http-equiv="X-UA-Compatible" content="IE=edge" />
<meta name="viewport" content="width=device-width, initial-scale=1.0" />
<title>bind</title>
<script src="https://unpkg.com/vue@3"></script>
<style>
.red {
color: red;
}
</style>
</head>
<body>
<div id="app">
<p>
<span :title="message">
동적으로 바인딩된 나의 title을 보려면 몇 초 동안 마우스를 올려
놓으세요!
</span>
</p>
<p :class="{red:isRed}" @click="toggleRed">
이것은 빨간색이어야 합니다! 전환하려면 저를 클릭하세요!!
</p>
<p :style="{color}" @click="toggleColor">
이것은 녹색이어야 하며, 클릭 시 녹색과 파란색 사이를 전환합니다.
</p>
</div>
<script>
const { createApp } = Vue;
createApp({
data() {
return {
message: "안녕 Vue!",
isRed: true,
color: "green",
};
},
methods: {
toggleRed() {
this.isRed = !this.isRed;
},
toggleColor() {
this.color = this.color === "green" ? "blue" : "green";
},
},
}).mount("#app");
</script>
</body>
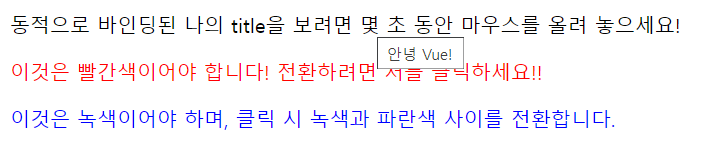
</html>this.isRed에서 isRed의 default 값은 True이다. click 한 경우 != 메소드 발생하여 False가 되어 색이 변하게 된다.
✔ 기본예제 1 결과
✔ 기본예제 2
<!DOCTYPE html>
<html lang="en">
<head>
<meta charset="UTF-8" />
<meta http-equiv="X-UA-Compatible" content="IE=edge" />
<meta name="viewport" content="width=device-width, initial-scale=1.0" />
<title>vue</title>
<script src="https://unpkg.com/vue@3"></script>
</head>
<body>
<div id="app">
<button @click="show = !show">목록 전환</button>
<button @click="list.push(list.length + 1)">숫자 추가</button>
<button @click="list.pop()">숫자 제거</button>
<!-- .pop은 원래 JS에 있는 배열의 마지막 인덱스자리의 값을 지워주는 기능 -->
<button @click="list.reverse()">목록 뒤집기</button>
<ul v-if="show && list.length">
<li v-for="item of list">{{item}}</li>
</ul>
<p v-else-if="list.length">목록이 비어있지 않지만, 숨김처리 되었습니다</p>
<p v-else>목록이 비었습니다</p>
</div>
<script>
const { createApp } = Vue;
createApp({
data() {
return {
show: true,
list: [1, 2, 3],
};
},
}).mount("#app");
</script>
</body>
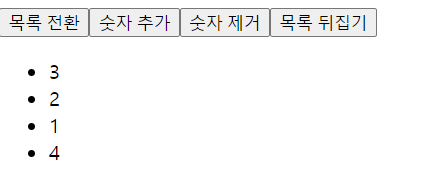
</html>v-if, v- else-if 문을 사용하여 원하는 출력을 할 수 있다.
✔ 기본예제 2 결과
기본예제 3
<!DOCTYPE html>
<html lang="en">
<head>
    <meta charset="UTF-8">
    <meta http-equiv="X-UA-Compatible" content="IE=edge">
    <meta name="viewport" content="width=device-width, initial-scale=1.0">
    <title>form</title>
    <script src="https://unpkg.com/vue@3"></script>
</head>
<body>
    <div id="app">
        <h2>텍스트 입력</h2>
        <input v-model="text"> {{ text }}
        <h2>체크박스</h2>
        <input type="checkbox" id="checkbox" v-model="checked">
        <label for="checkbox">체크됨 : {{ checked }} </label>
        <h2>멀티 체크박스</h2>
        <input type="checkbox" id="chulsoo" value="철수" v-model="checkedNames">
        <label for="chulsoo">철수</label>
        <input type="checkbox" id="yuri" value="유리" v-model="checkedNames">
        <label for="yuri">유리</label>
        <input type="checkbox" id="maenggu" value="맹구" v-model="checkedNames">
        <label for="maenggu">맹구</label>
        <p>
            체크된 이름 : <pre> {{ checkedNames }}</pre>
        </p>
        <h2>라디오</h2>
        <input type="radio" id = "seoul" value="서울" v-model="picked">
        <label for="서울">서울</label>
        <br>
        <input type="radio" id = "busan" value="부산" v-model="picked">
        <label for="부산">부산</label>
        <br>
        <span>고른 거 : {{ picked }}</span>
        <h2>선택</h2>
        <select v-model="selected">
            <option disabled value="하나를 선택하세요"></option>
            <option>가</option>
            <option>나</option>
            <option>다</option>
        </select>
        <span>선택함 : {{ selected }}</span>
        <h2>복수 선택</h2>
        <select v-model="multiSelected" multiple style ="width:100px">
            <option disabled value="하나를 선택하세요"></option>
            <option>무궁화</option>
            <option>개나리</option>
            <option>진달래</option>
        </select>
        <span>선택함 : {{ multiSelected }}</span>
    </div>
    <script>
        const { createApp } = Vue;
        createApp({
            data() {
                return {
                    text: '수정해보세요!',
                    checked:true,
                    checkedNames : ['철수'],
                     picked:'서울',
                    selected : '가',
                    multiSelected : []
                }
            }
        }).mount('#app')
    </script>
</body>
</html>
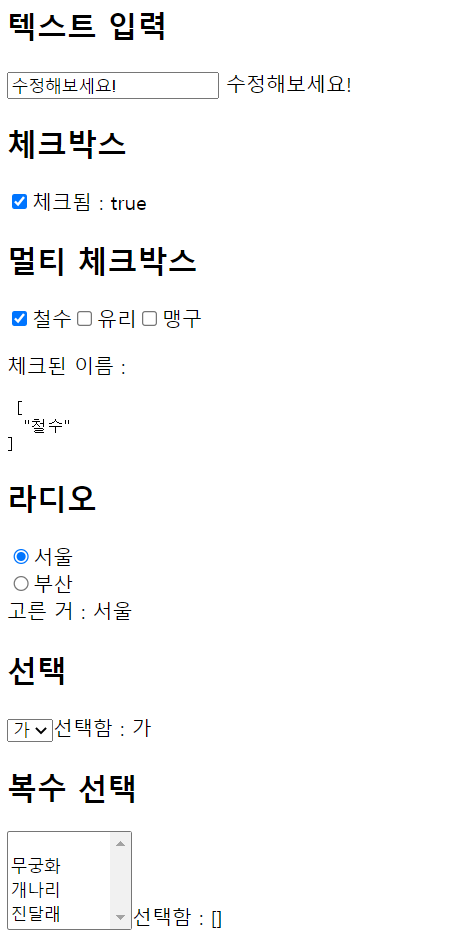
✔ 기본예제 3 결과
반응형